Overview
You can electronically collect event waivers for your department and student organization via our Electronic Waiver Collection Tool. This system:
- Helps you identify which waiver(s) is appropriate for your needs,
- Creates your event waiver based upon the details you submit,
- Allows you to collect waivers via QR code, electronic link, or paper form,
- Stores your waivers in accordance with UCLA's document retention policy.
It can be accessed by active UCLA staff members, active UCLA faculty, and the current signatories of student organizations.
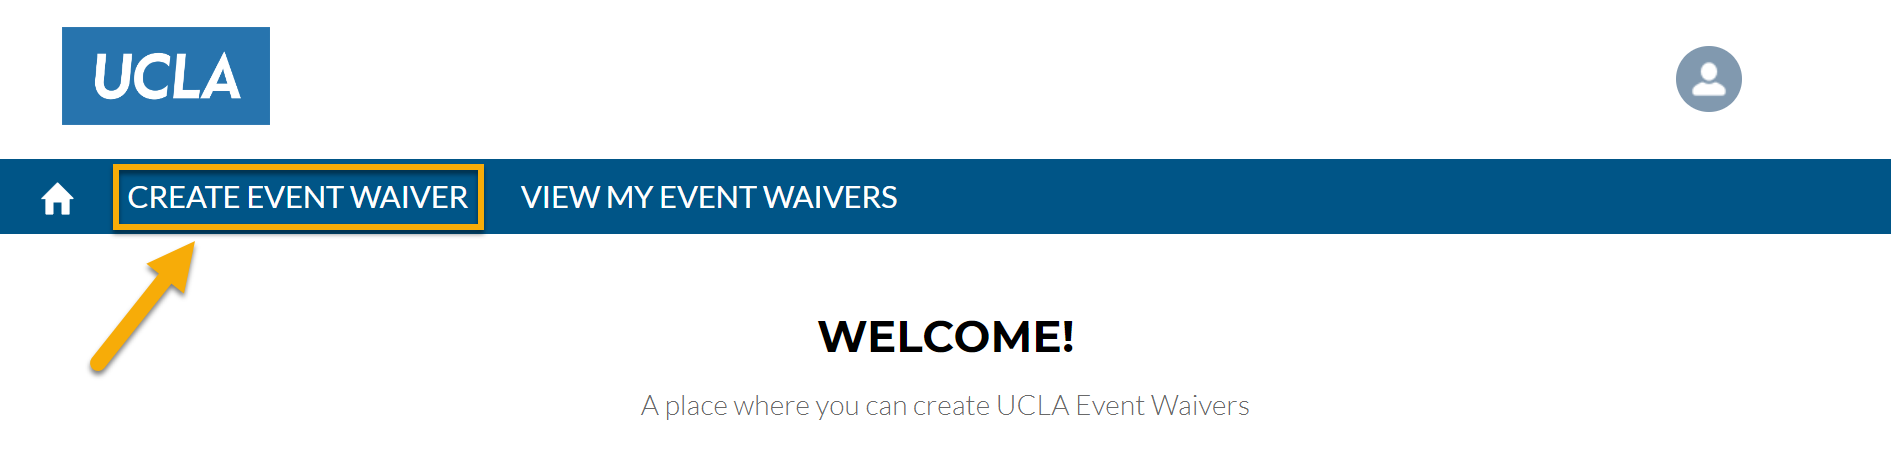
2. Click on the Create Event Waivers tab.
3. Choose from the two waiver options:
• Yes, I know what I need: allows you to directly select the needed waiver type(s).
• I am unsure. Please help me choose: provides on-screen prompts to help you select the proper waiver type(s).
4. Answer the remaining prompts.
5. Provide all the required event details.
6. Review theEvent Summary and select the appropriate next-step button:
• Cancel Event: delete the event from the system.
• Edit Event Details: correct any mistakes you may have found in the Event Summary.
• Save and Close: save the event for later. When you're ready, you can access the event and generate the associated waiver(s) through the View My Event Waivers tab.
• Save and Generate Waiver: create the waiver and access the collection methods.
7. Once submitted, a confirmation email will be sent to you.
1. Sign into the Electronic Waiver Collection Tool via SSO.
2. Click on the View My Event Waivers tab.
3. Select the event waiver number located in the Id field.

4. The waiver details will populate.
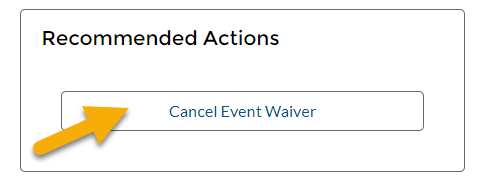
5. The Recommended Actions box will appear on the right side of the page.
6. Select the Cancel Event Waiver button.
7. Enter the cancellation reason (e.g., incorrect information submitted or event canceled).
8. Once submitted, a confirmation email will be sent to you.
9. If needed, generate a new waiver with the corrected details.
2. Click on the View My Event Waivers tab.
3. Select the event waiver number located in the Id field.
5. The Electronic Waiver Links box is located on the right side of the screen. The following collection options will display:
• Waiver URL (English): directly share with participants
• Waiver QR Code (English): display at your event
• Paper Waiver (English): print copies for your event
• Waiver URL (Spanish)*: directly share with participants
• Waiver QR Code (Spanish)*: display at your event
• Paper Waiver (Spanish)*: print copies for your event
* Only populates if the "Do you need an event waiver in Spanish?" box was checked on the initial creation form.
2. Sign into the Electronic Waiver Collection Tool via SSO.
3. Click on the View My Event Waivers tab.
4. Select the event waiver number located in the Id field.

5. The waiver details will populate.
6. The Files box is located at the bottom of the screen.
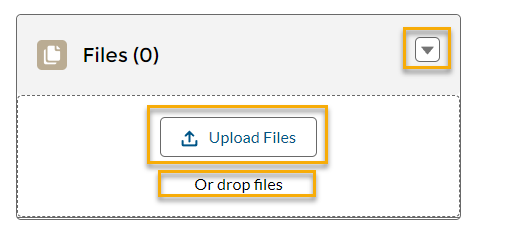
7. Upload your paper waiver file(s) by:
• Selecting the Upload Files button
• Dragging the file(s) directly into the box
• Selecting the dropdown icon and clicking Add Files
1. Sign into the Electronic Waiver Collection Tool via SSO.
2. Click on the View My Event Waivers tab.
3. Select the event waiver number located in the Id field.
4. The waiver details will populate.
5. Select the View Waiver Responses Report button located at the top of the page.

6. You will now see the first and last names of all participants who have electronically signed the waiver.
5. Select the Print or Export to Excel buttons to export the information.
1. After your event is over and you have uploaded all paper waivers, sign into the Electronic Waiver Collection Tool via SSO.
2. Click on the View My Event Waivers tab.
3. Select the event waiver number located in the Id field.
4. The waiver details will populate.
5. The Recommended Actions box will appear on the right side of the page.
6. Select the Complete Event Waiver button.
FAQs
We've compiled our most frequently asked questions and outlined the best practices for managing/collecting waivers! Can't find the answer you need? Send us a message.
General
• General Waivers: intended for voluntary, in-person activities
• Virtual Waivers: intended for voluntary, virtual activities
• Photo Release: intended for use when the department wishes to photograph and/or record an event
• Facilities Use Waivers: intended for individuals using campus facilities, equipment, and service
• RCO Waivers: intended for events and activities sponsored by Registered Campus Organizations (RCOs)
Collection and Storage
• Bookmarking the URL on a device
• Displaying QR codes to encourage participants to sign using their own device